Creating
Liferay MVC Portlet with Liferay IDE
Step:
1
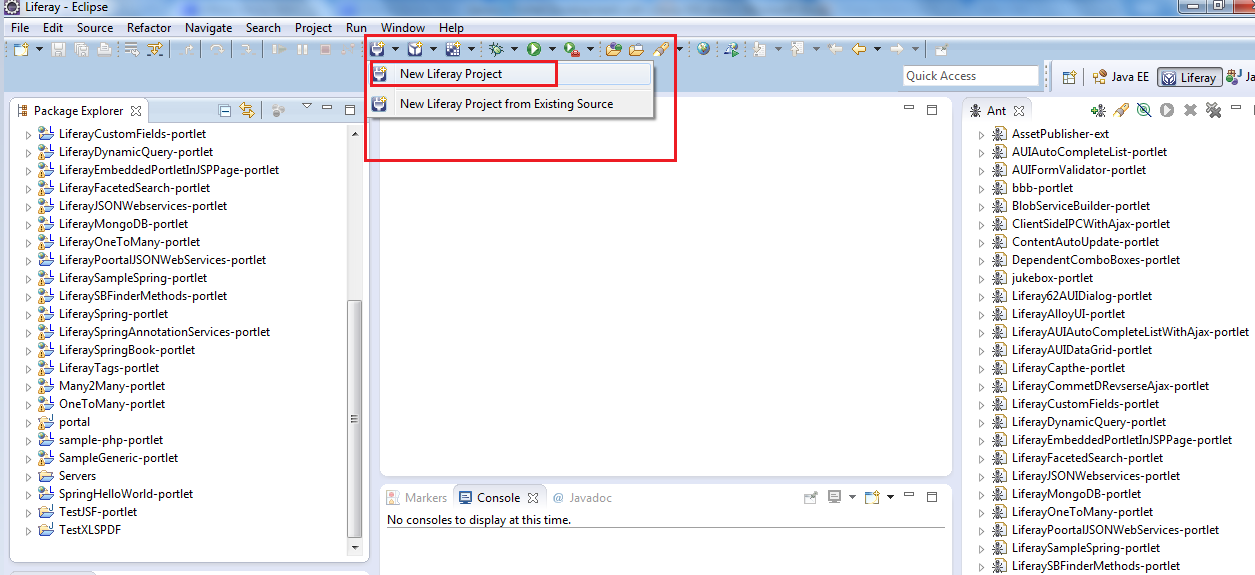
In the eclipse click on create New LiferayPortlet option in eclipse.
The
following is screen show create new liferay project
Step:
2
In the Project Dialog we need provide -:
Project Name -: CRUD-Legacy
Display Name -: Leave blank it will updated once portlet is created
Location -: by Default its SDK path, you can choose your path
Build Type -: ANT
Plugin SDK -: liferay-plugin-sdk-6.2
Liferay Runtime -: liferayv6.2 CE Tomcat
Plugin Type -: Portlet
Include sample code and check the box i.e. Launch New Portlet Wizard after project is created, once we have done
all click on Next
Follow
the below screen

Note:
We have different built types (Maven and Ant) select ANT
type which is default one.
If you have multiple server environments then select
your environment
If you have multiple Plugin SDKs then select your
Plugins SDK.
Plugin type we have options -:
Portlet
Service-Builder
HOOK
Theme
Layout
Ext
We are developing simple portlet so choose portlet Plugin
type in select box.
We need check the check box Launch New Portlet Wizard after
project is created so that we will get another widow after created the portlet
and there we can give our custom portlet
class name.
From Liferay IDE 2.x onwards Project Dialog window
have many option at the time of portlet creation and this is different from
older version of IDE.
Step:
3
Once we click on next in above step then we will get
another dialog window here we need to select portlet development frame work.
We
already know we are using Liferay MVC frame work. Now we need click on radio
button Liferay MVC then click on finish.

Note:
As soon as you click on finish it will create
Liferay MVC portlet and it will add all configuration files and it will create directory
structure it will take few seconds to create all.
Step:
4
Once project is created .Click on Project and goto-> new->Liferay Portlet then you will get another Dialog
Window there we need give
Portlet Class -: Offer
Java package-: com.test.legacy
Super Class-: com.liferay.util.bridges.mvc.MVCPortlet finally click on next button.
Follow the screen below.

Step:
5
Once we click on next in above step we will get
another dialog there we have to provide some more information so that portlet
will be created accordingly.

Once portlet is created you can see Portlet Project in
Package Explored i.e. in left side of Eclipse IDE and Portlet related ANT build
file i.e. you can see in ANT view which is right side of eclipse.
The following screen shows you Project and
it ANT file

While Project creation as I said it will create all
required portlet configuration files and its configurations as for the data we
provided at time of project creation. It will also create the directory structured
for the project.
Each Portlet project has its own ANT build file i.e.
build.xml
file and this build file have different targets to deploy the portlet into liferay
portal.
The
following is screen shows Project Directory Structure and ANT build Targets.

Note:
At time of project creation it will create one default
portlet after that we have another dialog window there we have created new portlet
and there we provided our custom class name, so totally we can see two
portlets.
Here we can ignore default portlet or you can remove
default portlet configuration form portlet.xml, liferay-portlet.xml and
liferay-display.xml files.
When we use Liferay IDE 2.x we can see above
scenario.
Portlet
Deployment:
When we create portlet project then each project has
ANT build file i.e. build.xml
file, it has ant targets to deploy the portlets in liferay portal servers.
In the eclipse if we see in ANT view right side, you
can see portlet project build file. If you e open tree view then you can see
all available ANT targets for the portlet project.

In the available targets one should be default one that
is you can see different color in the ANT view.
We will use ant deploy
target to deploy the portlet in liferay portal server.
Simply double click on deploy target in the eclipse
ANT view so that portlet will be deployed into liferay portal server that is
tomcat or Jboss
When we run deploy target all log message you can
see in eclipse console view.

If no compile time error then it will show build
success message otherwise it show compiles time errors in the console.
If build success then it will be packages as war
file and deployed into liferay deploy directory.
As soon as war file places in liferay deploy directory
auto deploy scanner will copy the portlet into server deployment directory and
it will be extracted in deployment directory then portlet available in the
application so that we use it.
Start
Liferay portal Server
Before you deploy the portlet your liferay portal
server should be start mode.
We can also start server from eclipse that is
configures servers in servers views you can simple click on start option then
server will be start.

Once we successfully deployed portlet and start the
server then portlet available to add in page.
Using
Portlet:
Access Liferay portal using you host name port
http://localhost:8080
Generally when create portlet then it will be
available in sample category default. We already know at time of creation we
will provide the category we can find there.
How to withdraw winnings from casino? | drmcd
ReplyDeleteCan I win 제천 출장안마 a 서귀포 출장샵 $100 with 경주 출장안마 a casino account? · Click on the “Join 아산 출장안마 Now” button · Click “Join 구미 출장안마 Now”. · · Click “Join Now”.